Showing posts with label gimp. Show all posts

Wednesday, May 22, 2013

Pro-style Placeholder Image for Chooser Dialogs

I have been busy with my game development so my blog and tut video stream have been a bit quiet.


Meantime here's a quick video tutorial on creating one of those nice "chiselled grey text" placeholder images that make an image chooser dialog in your game or app so much more pro-stylee.


For this sort of job I often use the GIMP which is a great piece of open-source software and for me one that provides all the functionality I need in bit-map graphics for game development.  To get GIMP for the Mac, go here: http://www.gimp.org/downloads/ and click Download GIMP 2.8 to get Simone Karin Lehmann's build - the others I find are often missing stuff and don't work nearly as well on Mac as her builds.

If you work through the tutorial and are looking for more here are some things you can do that will give some extra nice polish to the chiselled text placeholder.

Carefully color match to your dialogs background.


You can try to get the GIMP to produce the same color for its image background as your dialog, but because of the way the map filter works with the "compensate for darkening" not always being accurate, I suggest instead setting up your GIMP image to be as close to the color you want as possible, and then adjust the dialog background color in your UI designer.  On Mac you can use the magnifying glass on the color chooser to pick up the color of the image:


If you're using XCode for example you can navigate to the color chooser for the background color of the dialog, and then click on the magnifying glass and go across into the the Preview app which you have open alongside showing the image with the color you want to match.  Then just click to sample that colour.  Your XCode dialog is now the exact same background color.

Change the Look of your Chiselled Text


Try applying a blur to your black text after you've typed it in, but before you use it as the bump map.  This will cause your chiselled letters to have a more rounded look instead of the straight sides.  Depending on what you want it might look good in your app or game.

You can also play around with the settings in the Bump Map dialog to get different effects.


Get a Smoother Look


If the aliasing and jags on this image are annoying you can get a better result by running through this exercise with everything done twice as big.  So start out with an image that is twice as wide and twice as high as described here, and use a font that is twice as big.

When you have the final result, the scaling down process will nicely smooth out the jaggies.  This produces a better smoothing result than trying to blur the image you have.

Sunday, March 24, 2013

Exporting layers from Gimp as PNG files

Gimp for MacOSX is now a "native" (-ish) application, and is a great graphics tool for game developers - especially those who can't afford Photoshop.  I've always used it and wouldn't go for PhotoShop as I know GiMP so well now.

You can create animations in layers and Gimp allows you to preview your animations when you've done them as a bunch of layers, by simply invoking the handy "Animation" option in the menu:  "Filters" > "Animation" > "Playback..." - very nice.

But now how do you export those layers as a collection of separate PNG's so you can import them via TexturePacker into your game?

It turns out there is a handy Gimp plug-in to help you - but installing it is not for the faint-hearted.

Installing Plug-ins for GiMP on Mac OSX

On Windows or Linux the process is comparatively easy and is described in a nice tutorial.  If that article happens to be unavailable the GiMP registry lists a number of others.  On MacOSX where normally things "just work" for some reason its a lot more obscure.

The first insight is to know how to find your plugin folders.  Use the Preferences menu in GiMP to find the Folders item and choose "Plugins":


I didn't use the one for just my user name because I wanted the changes in GiMP to be available to anyone using the GiMP install on this computer.  Also it saves me a step as I don't have to create that folder.  I used the GiMP internal folders.  It also has the advantage that if I copy that GiMP to another machine, its plugins go with it.  Nice.

The second thing to know is that there is a laundry list of different types of things that you can install into GiMP, and this makes things more complex for the GiMP automation newbie.  You have "scripts" which are small helpers that can automate what GiMP already knows how to do.  Then you have "plugins" which are larger actual programs which extend GiMP's functionality.  And then there is modules, brushes and the list goes on.

Confusingly enough scripts are written in scheme, but if you want to write a script in python, that is considered a plugin.  Why?  Because the GiMP authors decided it would be so.  In any case if you want to install the export_layers Python script, you have to install it in the plugins folder.

Also since it is a plugin, it has to "look" like the other plugins which maybe complied C program binaries and so on - in other words it has to be executable.  If it isn't then it won't show up when you restart GiMP.  And also - note - restarting GiMP is required, since this is a "plugin": you cannot get it to show up by selecting the "Refresh" option from the script-fu menu in GiMP.

So first step - shut down GiMP.

On MacOSX using the Terminal its then an easy 3 step process:

cd ~/Desktop
curl -O http://gimp-registry.fargonauten.de/files/export_layers-0.6.py.txt
chmod a+x export_layers-0.6.py.txt
mv export_layers-0.6.py.txt /Applications/Gimp.app/Contents/Resources/lib/gimp/2.0/plug-ins/export_layers

If you have problems using the Terminal I really strongly suggest that you start getting over them.  Seriously.  You're missing out on a lot of what Mac has to offer - all the power of Unix just a few keystrokes away.  It's much faster and much easier to capture the process to repeat or modify it.  In some cases the Terminal is the only way to do things.

I use a mixture of UI dragging-and-dropping and always have the Terminal handy to do things that the Terminal is great for.  If your Terminal is not already running, type <cmd>-<space> in Finder and then type "Term" to get hold of it with Spotlight, then press Enter.  With your fingers on the keyboard you're ready for the Terminal to do your bidding.

Let me demystify the above a bit for those of you not keen on the Terminal:

  • First I change directory to the Mac desktop - we're going to temporarily store the downloaded plug-in there. 
  • Next we use the curl command that downloads stuff
    • I use the -O (that's a capital Oh) to say that the output file should be named 
      • curl will call it after what ever it was on the server I got it from.  
    • Try typing "man curl" to find out more about curl - its a handy tool
  • Then the script has to be made executable with the chmod command
    • if you've managed to get the Python script in the right folder but it still does not appear in GiMP - you probably missed this step.
  • Finally copy the script into place.

To do most of all this graphically is possible, but its a pain.  You'll need to
  • Go to the export_layers plugin web page and right-click on the link to download it to your Desktop.
  • Now you'll need to make the file executable
    • I know of no way to do that apart from the command line - so you'll need to open the Terminal for that.  
    • See the above "chmod" command, and first cd to wherever you downloaded the file to.
  • Click on the downloaded file and rename it to export_layers
  • Now go back to Finder and open two windows.
  • In one, navigate to your Gimp program in the Applications folder, right-click and
    • choose "Show Package Contents"
    • the Finder window will change to a view of the inside of the GiMP application bundle.
  • Navigate down to through these folders
    • Contents > Resources > lib > gimp > 2.0 > plug-ins
  • In the other window navigate to your desktop
  • Drag-n-drop the executable export_layers into place in the plug-ins folder in the other Finder window
Now when you restart GiMP you will find that you have a new menu option under the "File" menu with "Export Layers" > "as PNG" which will do what you need. Note you may find some oddness/bugginess with where it drops the generated files. If that happens, use Spotlight to find them - in my case they were dropped into my home folder.

Bonus Content

There are a bunch of Mac file name changer apps out there. If you're a Terminal master you don't need 'em.

After running the file export my original sprite sheet called "process-working.xcf" had resulted in a bunch of weirdly named files as a result of the Export Layers command. The names were like "process-working_xcf-working-1.png" - where the first part was the file name and the second parts were all the layer names.

for f in *; do g=${f#process-working_xcf-}; do mv -v $f $g; done

This command will strip off the leading characters "process-working_xcf-" part and just leave the layer names. The -v just gives verbose output so you can see what it's doing. You'll need to cd into the directory where the files are located before running it.

This is using the Terminal (well, the Bash shell's) ability to do substring mangling. To find out more at the Terminal, type "man bash" and then a forward slash "/" and then "substr". Press enter a few times until it gets to the stuff with the curly braces. As explained there you can use the % instead of # do strip stuff off the end of the string instead of the beginning. For more complex things you can go from just using to f and g, to h and j as well - and so on - successively picking apart the string as you go.

When experimenting with this stuff it pays to preview your command before you run it. You can do that by prefixing it with "echo" like this:

for f in *; do g=${f#process-working_xcf-}; do echo mv -v $f $g; done

Then you'll get a nice listing of all the "mv" commands that would be run, and you can inspect them to make sure your substring mangling did what you expected. Have fun!

Saturday, December 15, 2012

Preparing Scanned Line Art

For those times in your game where you need a more visual sort of element - like say the image that goes in an inventory for an RPG or adventure game - starting with a drawing is a good quick way to go.  Pixel art is great for small sprites, but if your image is going to be say 1/2 the screen size starting out clicking on pixels is going to take you a while.  For this kind of thing I often like to work with scanned in hand drawings.

But how do you get those drawings looking like the high-contrast, well defined rendered or pixelated images in the other parts of the game?  Maybe you don't and you want a more hand-drawn effect, but in this tut I'm going to show how I prep hand drawn images for import and coloring to use in my game.

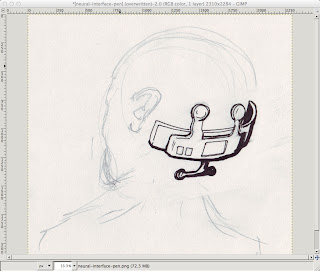
Prepare the pencil based artwork on a nice big piece of paper.  Don't worry about the details as you'll work over these in pen later.  Here I just wanted the neural interface gizmo to look like it would go on a human head, so that head is just there to get the shape right - it will disappear in the final result.  Notice how I don't bother rubbing out either - when I want to reposition something I'll just draw over it in the new spot, and pick the right line when I ink it.  Also note that I have not used blue - you can but typically you don't need blue pencil, and black pencils come in more kinds and are cheaper.
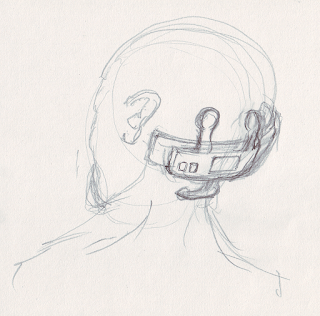


Ink over the pencil using your favourite pens.  I use Mitsubishi uni-ball ink pens which are nice and fast and dark, and Pentel chisel point art-markers.  I have some crow quills and a tub of ink somewhere but they're so messy.  Fibre tip fine pens are OK, but I find they scratch and split too much as I always press too hard.  Ball tips are fine as long as you start out with a big piece of paper.

Don't fret too much about mistakes as we can correct a lot of things digitally later.  The main thing is to get the ideas out onto paper.  Make your inking fairly bold and go over outlines to strengthen them up.  Areas with more ink I use the marker, sometimes I can get away by using the edge of the chisel-point, other times I have to go over the lines several times with the ball-tip.

Time to scan.  I just use a cheap CanoScan LiDE 25 USB scanner that works fine with my Mac gear.  Scan at 600DPI, and use the color setting, not the black and white.  I find if you try to go that way you'll lose too much detail from the drawing.  Its much better to threshold it in the drawing program as I'm about to show below.  Crop out unnecessary blank paper using the scan dialog if needed.  This will make the sketch load into Gimp a lot quicker.

For my art work I use a mixture of Manga Studio Ex for full comic spreads, and the Gnu Image Manipulation Program or GiMP for detail work.  MSEX is good but expensive.  And for some jobs GiMP is just as good.  If you're on Mac and haven't used GiMP for a while it has gotten really good, thanks to the work of the Free software community - it now runs natively and does not require an X server.  Its also a lot faster and many of the weird mouse-focus issues are fixed.  Obviously if you're on Windows or Linux, your mileage may vary.  For this article I'll be using GiMP, but the principles and tools apply to most platforms and other drawing programs even tho' the actual commands and menus may change.

Load up the image into GiMP.  Notice how the yellowy paper and pencil work is visible right now.  That's fine and you want to be able to pick and choose what stuff you leave in and out.

You should have a large image - mine came out 2310 x 2284.  If you get a small image - say 1024 x 768 or similar then your line work is going to get eroded by the threshold which is not what you want.  Either you need to get a bigger bit of paper and draw bigger, or check your scan DPI and ensure its 600DPI or maybe try a higher setting.  The images here have been scaled down to make for smaller uploads so don't go by their sizes.

Now for thresholding.  Right click on the image in GiMP to get the menu and choose Colors > Threshold.  If you're lucky the auto setting will be about right.  If there is too much unwanted stuff, or not enough ink, move the sliders around until you're happy.


Now that we have just the inked line art, we need to get it onto a transparent layer so that color can be applied.  The actual color will be done in another article/tut but getting the setup right as I'm about to show should apply to almost all methods of coloring that you might want to do.  The way it is right now looks OK, but the problem is any fills you apply will not appear to go right up to the edge of the line.  What you want is the line art on top of the color so that you can avoid white pixels where the lines edges are aliased.

Right click on the drawing to get the GiMP context menu and choose Select > By Color.  Click in the black line work, and after some time you should see all the ink selected as below.  It takes GiMP a while even on faster machines as it has to color match every pixel and we have a big image here.  Once its selected, choose Edit > Copy.  Now create a new layer, by clicking the anonymous little white "New Layer" button in the bottom-left corner of the layers dialog.  Name your layer "line-art".  Make sure the layer is transparent (not background color).


With the new layer selected choose Edit > Paste.  In the Layers dialog you will see a "Floating Selection".  Click the Anchor button on the Layers dialog to anchor it to your new layer.  Try turning on and off the eye icons - you should see that you now have a layer with just the linework and a transparent background.  Its hard to see what's going on with the linework, because of how transparent layers are displayed.  Next we'll add a white background to fix that.

Let's add two more layers: one will be transparent - call it "color" as this is where our color will go; and the last one will be white - call it "white background".  I always make a practice of naming my layers as they can quickly get out of control in a larger piece of art.  Make sure the line art is on top, with the transparent color layer and white background underneath.  You can turn off the original import by clicking the eye, as you don't really need it.  Turning it off should make your image appear just the same as after thresholding.  Now your layer dialog should look like this.


This is a good time to save your work.  Make sure that you save it in the .xcf format, by putting the characters ".xcf" as the file name ending.  This is GiMP's native format and it will preserve all your layers and so on.  Think of this as like the "raw source code" of your image, and you will "compile" it later by exporting to other formats such as .png.  If you don't have the xcf around its hard to recapture the structure of your drawing, so save to .xcf, save early and save often.

OK now we want to start cleaning up the image.  This involves a few GiMP skills that I will try to describe in more detail in another tutorial, but here is the guts of it:

  • do a lassoo select around your line art and then choose Select > Invert so that your next operation will apply to everything outside your linework.   Now use a really large eraser to clear out all the little dots and blobs from the background.
  • zoom in to your work with + and go over the lines with the Ink tool - press K to get it quickly and switch between Ink and Eraser (Shift E) as you clear up the lines
  • try using the "smooth" setting on the ink tool to help stabilise your ink strokes, and experiment with the settings.  I prefer a hard edged brush so check the brush settings if you're getting an effect that doesn't look right
  • to get long smooth lines you can use the Path tool and tell it to trace the path in Ink.  This works well but is complicated to get right and is the subject of a tut all by itself
  • fix up larger issues like scale or perspective by lassoo'ing the offending chunk of linework and using the rotate, shear and other transform tools.  Save is your friend.  command-Z is undo.
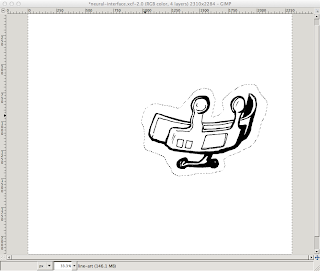
This shot shows removing splash around the linework using inverse-select and a large eraser.  (The screen grab didn't capture the eraser but its as big as the whole line art and clears the page in a few swipes).


Here I have cleaned a lot of linework with the Ink and Eraser tools - see around the nodule thing on the right hand side especially - and also the underneath chrome part has been rotated so its perspective is a bit more correct to the rest of the device.  (I took the inverse-select screenshot after doing this cleanup so to see the effect compare it with the post-threshold image above).

Save the .xcf file again at this point and use the "Save a copy" feature so that you can revert back to your good line art if something goes wrong.  Give it a name like "my-device-line-art.xcf".

At this point you would go ahead and start applying your layers of color on your "my-device.xcf" working image file.  Make sure to use separate layers, and not to mess up your line art layer.  Just to show the beginnings I have blobbed some color onto a couple of layers - the blue (which would become a metal chrome color job) is on the "color" layer from before and the orange I have put on a layer above that called "lights".


Anyway - that's all for this one, and hope you have fun GiMP'ing your line art.