Sunday, October 25, 2015

Block Twitter Trolls with GGAutoblocker

Because I'm an indie game developer, social media is basically the only way I can afford to promote my games, and thus pay the rent.

Without the budget of a big studio to pay for advertising & marketing getting on Twitter, Facebook, Google Plus and a bunch of other sites and forums is the only way I have of effectively communicating to folks about the games I build.  That means "just get off the Internet" is not an option for me.

But guess what else - apart from the game playing public who might be interested in my stuff - is on the internet?
https://youtu.be/TLEo7H9tqSM - Troll Hunter
Trolls.  Folks who love to attack, based on gender, or anything they perceive as weakness, and who use tactics ranging from obscure ranting arguments to outright threats to make life on the Internet into a living hell.

Well, it turns out there is something you can do about it - block them!  

But wait I hear you say, can't they just change from the last anonymous account they used to yet another new one?  Aren't I just going to be playing whack-a-mole waiting for these idiots to crop up on my feed before I block them?

This is where you need some help from the professionals!  An engineer named Randi Harper has come up with a tool called GGAutoBlocker which automates the pain of keeping up with block lists, at least so far as Twitter is concerned.

Here's how to use it. You might want to keep this page open on say the left side of your screen, while you open a new browser window on the right side. Then start by right-clicking (and choose open a new window) this link to GGAutoBlocker which will take you to step 1.


This is the GGAutoBlocker.com site (which is actually a page in Randi's blog) which has two links you need.  Right-click the first one and open in a new tab, to get to step 2.


By following the link from the GGAutoBlocker page you'll find yourself on BlockTogether.org's website where you can sign up to use their Twitter blocking services, by hitting the sign-up button.


The sign-up button will take you to a page that allows BlockTogether.org's web-app to access Twitter on your behalf.  Sign in here with your Twitter credentials.  Make sure you use the Twitter credentials - username & password - that you use for the account you want to be protected by the block list. Is it safe?  Its as safe as any service these days, and if you later decide you don't want BlockTogether.org doing stuff on your behalf you can go into your settings on Twitter.com and nix the permissions.


Now you are all signed up to use BlockTogether, you need to get to the specific GGAutoBlocker block list.  Go back to the tab from Step 1 with the GGAutoBlocker page, and click the link for the actual block list. You're one step away from blocking Twitter trolls!


You should now have the GGAutoBlocker block list page up on BlockTogether.org listing thousands of trolls to block.  Now you can just click the blue button to block all the trolls on the list!

What if Someone is Wrongly Blocked?


What BlockTogether.org and GGAutoBlocker is doing is recording & automatically blocking all the trolls that were identified by Randi's automated scripts.  Its really the same thing you can do manually by blocking someone on Twitter.  Now there's of course a chance someone you really wanted to hear from was blocked but you can fix that in a second by just using Twitter to unblock them.  There's more advice about how that works on BlockTogether.org's website.

This Only Works for Twitter - what about Facebook & other sites?


That's true.  You could support Randi and other's in their work on OAPI which is trying to do more to prevent online abuse. Until more tools become available there are still good privacy controls in Facebook, Google and other services that you can use to block people.  Sorry its so horrible out there.

Isn't it Wrong to just Block People?


No, you don't have to listen to people whose goal it is to hurt you.  They might have a bunch of free speech arguments, but really they don't care about anyone's freedom except their own ability to freely cause harm.  Randi has a bunch more on this topic on her "Frequently Yelled Statements" page.  I like how its called that instead of "Frequently Asked Questions".

Sarah, you're a Terrible Person for Supporting This


No, actually I'm really not.  For anyone determined to push this line I say "Just go ahead and make a comment so I can block you".  :-)

But seriously your freedom to speak does not extend to this forum which is my own blog.  Here I can block comments if I like.  If you want freedom to attack people go and do it elsewhere.

Freedom of speech does not guarantee me - or anyone else - listening.

The People behind this GGAutoBlocker are Terrible People.


That's what's called an Ad Hominem attack.  There's a lot of inflated claims, and just plain falsehoods generated by the very trolls who are blocked by this tool.  The internet troll's stock in trade is fabricating things & wildly exaggerating others to attack, defame, gaslight & discredit anyone they take aim at.  Blocking such liars is the first step to taking away their power to hurt folks.

--

I hope this guide helps someone and if you have any relevant comments feel free to leave them below.

Tuesday, September 8, 2015

CPAN modules on Mac OSX

Got problems with PKG_CONFIG_PATH on Mac when trying to install Perl modules via CPAN?

Update: take care, see message at the bottom of this post BEFORE typing any of the commands listed here.

Maybe this will help.  First some background.

I wanted to write a Perl script and use the Text::Hunspell perl module plus whatever dependencies it required.  I know from experience its a pain to install a module with all its dependencies, so I usually use CPAN for that stuff.

To access CPAN on Mac just open a Terminal window and type

perl -MCPAN -e shell

That will take you into a shell environment for the CPAN command line utility, from where you can first configure CPAN (usually pretty much automatically by hitting return to accept all its defaults) then install packages via:

install Text::Hunspell

You can discover the names of packages you might want by browsing CPAN itself using your web browser.  For example if you're looking for XML parser modules just type "xml parser" in the search box.  There heaps and heaps of great free modules there for just about anything you can imagine.

Now the problem comes on Mac where your module you want to install depends on some binary program that you've installed, but which Perl cannot find.  Because Perl is built on C and has a Unix like behavior for compiling and otherwise dealing with binary programs it will fall back to trying to use the pkg-config utility to find the binary programs.

In my case I had installed Hunspell from the source package available on their website.  Once I had downloaded the .tar.gz file I built it via:

cd ~/build
tar xf ~/Download/hunspell-1.3.3.tar
cd hunspell-1.3.3
./configure
make
sudo make install

If you're trying to do the same thing, or trying to build some other software and are getting errors about the compiler and toolchain, make sure that first you have installed the command line version of the Xcode tools.  There's a good guide on this Rails site.  If you can type

gcc -v

and get something like

Apple LLVM version 7.0.0

Then you already have the tools.  Otherwise follow the guide to make sure you have Xcode installed and then run

xcode-select --install

...to install then.

OK.  We have a new binary program - in my case hunspell - installed in /usr/local - and now we want to hook up Perl to it but there is a problem.  Perl won't look in /usr/local by default and thus you will get failures from CPAN's shell when you try to install.

To fix this in my case I installed pkg-config from the handy installer on this page.  You want the link that says Download: PkgConfig.pkg - once downloaded install it as usual for .pkg files but note you'll need to right-click and "Open" it as its not signed.  Note that pkg-config gets installed under /opt/pkgconfig/bin.

Once its installed you'll need to tell your shell how to find the relevant files: add these lines to your bash profile by editing the appropriate file:

~/.bash_profile

...and adding the following lines:

export PATH="$PATH:/opt/pkgconfig/bin"
export PKG_CONFIG_PATH="/usr/local/lib/pkgconfig"

Now you're ready to run the Perl CPAN shell again.  One more thing however:  if you are going to install CPAN modules for the whole of your Mac OS X system, rather than just to your local user account you may run into issues.

If you run the following command:

sudo perl -MCPAN -e shell

to install as root, or if you ask Perl to go to sudo for you, then your build environment may not get the environment variable that you so painstakingly added to your bash profile.  To fix this pass the -E switch to sudo like this:

sudo -E perl -MCPAN -e shell

Now you should be good to go ahead and install loads of cool Perl modules!  Have fun.


Update: If you run perl unprivileged by typing 

perl -MCPAN -e shell

Then you will get a prompt inside CPAN asking you if you want to use local::lib - if you accept that you'll get a mysterious environment variable added to your .bashrc that causes your perl installs to go into your home directory, e.g. ~/perl5

This just wasted several hours as following that CPAN could not find those modules and you get piles of errors about modules not found, wrong versions, and missing dependencies.  It's because the MakeMaker is installing its stuff into the ~/perl5 directory as instructed by PERL_MM_OPT.  But CPAN is not looking there.

To discover if you've hit this issue type 

env

in a Terminal and check if one of the variables is PERL_MM_OPT.  If it is then local::lib as implemented by the CPAN shell has modified your .bashrc for you.  Nice.

Just edit .bashrc to remove the offending lines (they're documented here) and then start a new Terminal window to get the shell environment minus the option.  Now to be safe delete the ~/perl5 directory, the ~/.cpan directory and start again from scratch with your privileged CPAN using sudo as above:

sudo -E perl -MCPAN -e shell

If you really want to use local::lib then try looking up separate doc for that.  Its beyond the scope of this post.

Thursday, August 6, 2015

Fixing SKLabelNode performance issues

I'm loving working with the Sprite Kit API for game development.  Using all the tools I'm effective with, that other software dev folks would know: a good code editor, nice tool chain and a well-documented API; I can really get stuff done.

In a primarily graphical environment sure you can lay things out visually, but for the thing I'm currently trying to do - layout a virtual keyboard for a game - I need to do it programmatically so I can cope with changes in screen size.

But: I found some issues with the layout code pausing big time, during the load sequence.  This was revealed by testing on a 3 year old iPad Mini that I keep around just because its great at exposing these sorts of problems.

Folks, do not EVER rely on testing your game or app in the simulator.  Use a device ALWAYS.  Once you have your project mostly done and discover you've introduced some horrible performance issue, its going to be impossible to find.

This one manifested as an ugly lag in the response after hitting the "Play" button and it needed to be fixed.  I used the Xcode tool "Instruments" and fired up the Time Profiler to drill and find the culprit.  If you've never used Time Profiler before there's a good Ray Wenderlich tutorial on it.  I also used a home grown time logging tool, the code for which I have stuck up on GitHub.  Being able to instrument my code by hand is a great complement to using the Instruments tool.  Here's some of the output from my tool:

Time stamps:
    Before press play button - 0.0
    Play button pressed - 0.00773762501194142
    Starting transition - 0.322784499992849
    Game Scene didMoveToView start - 0.323094458348351
    Scheduled music - 0.323781083337963
    setupGamePlay: done setupCarousel - 0.329451166675426
    setupGamePlay: done setupMonsters - 0.678052625007695
    setupGamePlay: done setupMissile - 0.945051541668363
    setupGamePlay: done targetMissileAt - 0.94512124999892
    Setup Gameplay - 0.945148375001736
    About to create keyboard - 1.07598399999551
    addKeys: About to calculateKeyCapMetrics - 1.07624216665863
    About to create SKLabelNode - 1.07625199999893
    About to set label text - 1.07641391665675
    About to set font size - 4.5479717499984
    About to set font color - 4.55641954168095
    Done with label - 4.55644533334998
    calculateKeyCapMetrics: about to setup frame - 4.56316420834628
    calculateKeyCapMetrics: about to calculate frame - 4.60020420834189

    calculateKeyCapMetrics: done - 4.60023920834647

There's a 3-4 second delay there while the SKLabel's text is set! That's crazy!

Luckily that is a one off, and subsequent calls to set the text with the same font turn out to be fast. Very interesting. More investigation with the Time Profiler:


It reveals that the iOS True Type font system is having to load the font - its a custom one that I added to the project, not one that ships with iOS. Its during the first load and unpacking all the font information that the delay is incurred. I guess there might be some reading from flash of the iOS device in that as well.

Right: so that makes it a good candidate for pre-loading after the start scene has been displayed but before the player presses the start button.

So, off I got and implement pre-loading of the font.
    
    func preloadResources() {
        let label = SKLabelNode(fontNamed: "Ancona-Ex")
        label.text = "preload"
    }

    
    override func update(currentTime: NSTimeInterval)
    {
        if !preload
        {
            preloadResources()
        }
    }

With that done, time to run a new profile session:

Time stamps:
    Before press play button - 0.0
    Play button pressed - 0.00989962500170805
    Starting transition - 0.318517291656462
    Game Scene didMoveToView start - 0.318650125002023
    Scheduled music - 0.318978958326625
    setupGamePlay: done setupCarousel - 0.324560000008205
    setupGamePlay: done setupMonsters - 0.69843762498931
    setupGamePlay: done setupMissile - 0.969889125000918
    setupGamePlay: done targetMissileAt - 0.969957374996739
    Setup Gameplay - 0.969982250011526
    About to create keyboard - 1.11275391667732
    addKeys: About to calculateKeyCapMetrics - 1.11366166666267
    About to create SKLabelNode - 1.11367308333865
    About to set label text - 1.11383529167506
    About to set font size - 1.11686108334106
    About to set font color - 1.12038704167935
    Done with label - 1.1204140833288
    calculateKeyCapMetrics: about to setup frame - 1.12638933333801
    calculateKeyCapMetrics: about to calculate frame - 1.1502004583308

    calculateKeyCapMetrics: done - 1.15022912499262

Time to create the label text has now dropped away to nothing! Nice.

Hope that helps someone else working with SKLabelNode and custom fonts.

Sunday, June 28, 2015

Unity is not Free

As I work towards getting my new game Word Monsters! published on the various mobile app stores, I'm mulling over the decision I made to go with Unity for this game.

Update 2: I contacted Unity's sales manager in Australia for clarification and there are a couple of things that makes this picture better than the scary thing it seems at first blush.  If you have questions, contact them via the Unity website: they're very helpful!  (Thanks Patrick).  Also, I should clarify that for hobbyists who NEVER really plan to make a living out of Unity games then the issues here may also not really be a problem.  If like me you're a serious indie developer who spends their days writing games and has to make a living out of it, especially if you do so through a Pty Ltd company then READ THE EULA and inform yourself.  You also might want to consider getting your lawyer to look at it: I am not a lawyer and this is not legal advice.

The Elephant in the Room
Its more and more obvious to me that the naive idea that a lot of developers go with around Unity - that its "free" - is completely wrong, and a bit dangerous.  For me the cost is around $6k by the time I convert into my local currency.  Let's break this down.

Non-Dollar Costs


First let's look at a couple of non-monetary costs.  I have noticed that load times are longer than native, and by an amount that might cause some players to drop off.  Also app bundle sizes are large: I'm struggling to get the size down.  I'm sure there's lots of things I can do.  I believe in "premature optimisation is bad" and as a result I'm looking to these things as I get closer to publishing, but its a real issue.  This could translate into a monetary cost if potential players are put off from the game - some players just delete a game if it takes ages to download or start-up.

Another cost:  calling out to iOS platforms like Social and Store is a pain from Unity.  Same for Android API's.  You need to use various wonky plugins from 3rd parties, and those might not play well with your existing plugins, and can add to your load time/app size headaches.

Is Unity free?


But the elephant in the room is that people treat Unity as "Free" - its not.  

I'm not saying its not worth what they're asking for it: around $6k AUD.  Its got amazing power and is a very feature-ful product.  Compared to other large software suites like the various 3D editors, like Adobe's products and other creative industry software its reasonably priced.

But wait, you say $6,000?  Unity Pro is only $1500, and you can pay a subscription of only $75 a month!

And then you say:
Well, it is $0, as long as you earn less that $100,000 - and wouldn't that be a nice problem to have.  Yeah, amirite?  Grin!
Not so fast.  OK - let's say I want to try to eke out a living making games, and I think "OK, lets meet Unity's conditions for the Personal Edition".  To do that I have to make less than $100,000 in a given financial year, so July 2014 - June 2015 for example.  But that is gross revenue, across all the Unity titles I have in the store, for my entity.  In my case the "entity" is Smithsoft, my company.  

The $100,000 is gross revenue.  Go and read the licensing conditions.  They're well written and worth a read.  So Unity is coming in to check on you before you get to deduct any of your costs.

How Much Can I Make Before Paying for Unity?

UPDATE 1: After a discussion with some game dev colleagues this first paragraph looks to be wrong.  If you don't receive the money in your bank account then it doesn't count as revenue.  So if the App Store takes it cut before passing on the rest to you, then "revenue" for the purposes of Unity's $100k calculation may be more forgiving.  My advice: check with your lawyer or accountant first.

UPDATE 2: The following paragraphs in this section have been reworded after clarification from Unity that "revenue" does mean money remitted to your bank account from, for example, the App Store.  But while you do get to effectively deduct App Store costs, you don't get to factor in all the other costs of developing the game.

Let's say that in a financial year after Apple takes its cut I get a smidgin under the Unity cut-off of $100,000USD as revenue in my bank account from sales of my premium iOS game.  That's around $130k AUD.

Out of that I have to pay for

  • contract developers 
  • artwork/artists/animators/modellers
  • voice acting, musicians
  • pre-made assets costs / Unity assets store purchases
  • work-space rentals
  • software costs
  • registering domains & running up a website
  • accountants
  • promotional video
  • advertising...
  • on and on it goes

anything else that it cost me to build my game.  There's a ton of hidden costs.

For some of us we do our own coding, art and so on.  Great, right - don't need no stinking contract developers.  But doing it yourself doesn't mean its free, as our time has value.  I could be working elsewhere as a Software Engineer at whatever the going rate is.  If instead you're working full-time for 6 months on no pay, that has a cost.  If you don't know how much it really costs to make games do some research, its not cheap.  Let's say its a casual game with one person full-time, and a few casual contractors bought in as needed to do art, etc, and took 6 months from go to whoa.  Total cost to make the game, conservatively $AUD80k.

Here at River City Labs over the past 3 years I have made my own game, and worked alongside teams of developers working on at least a dozen other titles to go to market.  I think $AUD80k is pretty fair on average for a casual game over 6 months right now.

Now out of the $130k I'm left with $AUD50,000 in my pocket - Software Engineers make twice that in a regular paying job.   And out of that I have to pay the Australian Tax Office its cut.  I'm not saying its a bad lurk, and it would be great to be that successful.

All I'm saying is that "making $100,000 a year" is not a path to fame and fortune that it sounds like.  By the time you factor in the costs of making the game its barely a living wage if you are trying to make a living so you can actually be a full-time game developer.  What I'm saying is that that figure is out of your gross revenue.  Do your sums first before you plan to "be successful" by sneaking in under the Unity revenue watershed.

If you want to take home enough money to actually pay rent, and put food on your table at home, then your gross revenue is going to be more like $200k AUD minimum so that by the time you pay your game dev bills you actually have something left to pay for food.

After Flappy Bird and A Dark Room it seems like you can make some game on zero budget but make out like a bandit on the App Store.  For every Flappy Bird there's millions of low-budget, low-quality games on the stores that languish and never make a cent.  You'd be better off packing grocery shelves for that time, and spending the money on a Lotto ticket for the chance you have to get paid that way.

The reality is that games with modest production values and good development teams behind them are the ones that succeed, and those games cost to build.

So Let's Buy Unity


Or, you can make more than $100k revenue, and go and buy Unity Pro.  I guess you can do that after you make the $100k threshold right?  Be careful - you can't use non-Pro stuff alongside the Pro stuff. There's caveats.  Read the license.  But anyway, we're assuming we're going to buy it.

Update 2: I contacted the Unity guys and they clarified that the intent of the "no mixing Pro and non-Pro" clause is just to make sure that everyone on the team doing development does have the Pro license.  You are totally fine to switch to Pro later in your games cycle.

So how much is Unity?  Let's assume you require Unity Pro because you broke through the $100,000 gross revenue watershed.  Further lets assume you got Unity because you thought it was so awesome that Unity lets you publish to both iOS and Android, and that's what you did.  Well you need to get:

  • Unity Pro - $US1500, 
  • Unity iOS Pro - $US1500, and 
  • Unity Android Pro - $US1500.  

And the costs add to a total of $4500 US - which is $5857.35 in Australian dollars.  That's the lion's share of $6k depending on exchange rate.  Before you click that buy button check what your local spend is going to convert to.

If I buy Unity 5 right now, for around $US4.5k, I get to keep and use it for ever.  Usually that's what buy means.  Nice.  If I'm grossing $US100k then that $US4,500 is not so bad.

But when Unity 6 comes along, all bets are off and I have to buy it all over again.  Note that the cost to upgrade from a previous version is cheaper.  But you do have to get your credit card out again.  Maybe the subscription option is looking good?

What About Renting it?


If I go the rental route I pay $75 a month, for each of the 3 items, and that is a total of $225 a month, and when Unity 6 comes out I just start subscribing to that.  Great.

And as soon as I stop paying I don't have Unity Pro any more.  Its like a spring-loaded trap if you don't set up your payments right.  I don't like that.  I'd prefer to buy up front and know I'm clear, but its a pain that I have to re-buy if I want the new hotness in later releases.

Is it really a trap?  In fact is it really so bad, if I don't get Pro and kind of fudge around that fact?  Nudge, nudge, wink, wink.

Unity Knows...


First thing you should know is this phrase from the license:
...may send data to Unity to: (a) check for Software updates; (b) provide aggregated usage statistics of your use of the Software and the use of your Licensee Content by end users; (c) provide analytics and advertising services; and (d) validate license keys
So how does Unity know that you're making more than $100,000 from your Unity games?  By having monitoring code in your games.  
  • You are required to have that code in there
  • you can't (legally) remove or circumvent it, and 
  • you are required to inform your players that its there as part of the privacy policy
Update 2:  If you get Pro then you have the option to turn off Unity's monitoring, and if you do that then there's no privacy policy requirement to inform your players.  Obviously if you have your own analytics you should check the privacy laws in your country.

So how scary could Unity's lawyers really be?  I don't know - and I don't want to find out.  The prospect of even some sort of shadow coming down over my games which are published on the Play Store or App Store is just terrifying.  I love being a game developer.  Unity's lawyers contact the App & Play Stores and say there's an issue with my games - what happens to my account on those stores?  That could be game development over unless I change my name, move countries type stuff.

Not to mention that being non-compliant with licensing means that if I decide to sell my IP, or my company which holds the games, or seek investment based on a stake in my company, then due diligence is going to close over my limbs like a bear-trap.  Here's me waiting for my nice check for Activision buying my company, and instead I get served a writ for failing to own everything I said I owned.

Due Diligence Bug-Bear


If you work for a company and expose your employer to due diligence issues you could be in trouble personally, depending on what your employment contract says, and what kind of shares you have.  If you've never heard of due diligence before, go and Google it - know about it before it bites you.

As a little guy, you might think "its no problem - none of that could ever happen to me".  Maybe.  If you want to stay a little guy.  Maybe Dong Nguyen, the author of Flappy Bird thought like that.  Or insert any other game dev success story.

And success only to have it all taken away by some legal nightmare is almost worse than no success at all, in my view - you might lose your reputation as well.

All I'm saying is if you actually want to succeed in game development you don't just brush aside legal concerns about licensing and think you'll solve them down the track.

Things that make you go Hmmm


So coming back full-circle - what are the options then?  Do we have to pay thousands for Unity if we want to go to iOS and Android?

Update 2:  Its possible to wait until some later time in your games development cycle, such as when it looks like you will make over $100,000USD and then buy Unity Pro.  The fact that you can still pocket say $50k for a years revenue without triggering the "Unity Pro" condition makes it viable to take the risk.  But in my opinion unless you're a hobbyist with no serious intent to try to be a full-time indie game developer, you REALLY want to read up all the Unity licensing, get advice, make sure you budget for that $6000 spend and be ready with your credit card for that day.

I'm wondering if it makes more sense to ship the iOS game using native frameworks like Sprite Kit.  If it makes any money on iOS, take the $6000 you saved by not buying Unity and get someone on UpWork to build the Android port, using for example Cocos2D-X or libGDX.

In the end the goals & drivers you might have, including targeted platforms, existing team skill-sets and so on are what dictates what you choose.  Unity is definitely worth the money, but just remember - its not free, so don't decide to go for Unity thinking its free.

Thursday, May 21, 2015

HeyZap Integration

Getting linker errors when trying to make Xcode build your Unity project after integrating HeyZap then Facebook?


Undefined symbols for architecture arm64:
  "_kUTTagClassFilenameExtension", referenced from:
      -[HZAFStreamingMultipartFormData appendPartWithFileURL:name:error:] in libHeyzapAds.a(HZAFURLRequestSerialization.o)
  "_kUTTagClassMIMEType", referenced from:
      -[HZAFStreamingMultipartFormData appendPartWithFileURL:name:error:] in libHeyzapAds.a(HZAFURLRequestSerialization.o)
  "_UTTypeCreatePreferredIdentifierForTag", referenced from:
      -[HZAFStreamingMultipartFormData appendPartWithFileURL:name:error:] in libHeyzapAds.a(HZAFURLRequestSerialization.o)
  "_UTTypeCopyPreferredTagWithClass", referenced from:
      -[HZAFStreamingMultipartFormData appendPartWithFileURL:name:error:] in libHeyzapAds.a(HZAFURLRequestSerialization.o)
ld: symbol(s) not found for architecture arm64
clang: error: linker command failed with exit code 1 (use -v to see invocation)

Its because the MobileCoreServices framework now needs to be included. See the images below.
UPDATED
Select the libHeyZapAds.a file in the Project

Ensure MobileCoreServices is checked


Friday, April 10, 2015

Unity Learnings on 5.x uGUI changes.

Recently I picked up a set of Unity tutorials via one of Joystiq's bargain offer packs.  My plan was to use the Easter break to power through and get as much of the new Unity under my belt as I could to see if with Unity 5.x it was now something I could use in my games.  The first tut I started was "Learn to Build Mobile Games Using Unity3D".

I quickly ran into the issue that there were a number of minor and irritating differences between 5.x and the tutorial materials for the  - I don't blame the Udemy tutorial folks for this.  As soon as you make a tutorial its out of date, and good material always has value even if a couple of the specifics have changed.

So, here in this blog post I'm going to cover what I have learned out of this exercise.  I figure this will be useful for folks who are looking to understand uGUI, or for those trying to see what has changed since the early 4.x days, or even just those interested in Unity.

My goal was to finish the tutorial - feature for feature - and to figure out for myself how to do the things that were different.  Specifically this meant understanding how to get the two text labels at the top of this single screen game working properly.

This is the Goal - Make These Labels Work

The first step is to add in two Text labels to the scene, using the right-click menu in the project view, and selecting Text from the UI menu.

Adding a UI Text Label

Do this twice and you'll have two text label.  Once they're in the scene name them appropriately so you can later distinguish which is which.  I've called mine Score Label and Ball Count Label.

UI Text Elements in Project View after Naming

Once you're done adding your project view will look like this, and notice that for free, you got a Canvas element which is the parent of both labels.  You can leave the Canvas element as it is for now - its basically a holder that shims between the 2D world of the GUI system and the 3D world of the game.

If you check out your game view now you'll notice something else weird - or maybe you will, it depends on the screen to pixels for your game.  What I have is a very large Canvas element depicted by the rectangle going off up to the right of the game scene.  If I zoom aallll the way out so I can see the whole of that rectangle, my game scene is a tiny thing in the bottom left corner.

Huge Canvas and Tiny Game!

Basically what's going on - and Unity may have fixed this by the time you read this, or your screen resolution may mean you don't have this issue - is that because the default Canvas is an overlay it's sizing translates to hundreds of units wide by high, where as your scene is probably one's and two's in size.  How to get around this?  The easiest way is to change your Unity editor window setup so that  your Game view is visible at the same time as the Scene view.  Just drag the tab with your Game view in it to some place in the layout where you can have it open easily.  I put mine side by side with the Assets window that doesn't get used all that much.

Now you can go ahead and use the Game view to see what is happening with your UI, and the Scene view continues to show the game layout of objects.  If you zoomed out to see the Canvas, zoom back in to your game play and just try to ignore the funny Canvas rectangle.

To handle updating the score and ball count values on my labels I just made two very simple MonoBehaviour scripts in C#.  This is the ScoreLabelController.cs script, just simply added to the Assets folder:

using UnityEngine;
using UnityEngine.UI;
using System.Collections;

public class ScoreLabelController : MonoBehaviour
{
 Text scoreLabel;

 public ScoreKeeper scoreKeeper;

 // Use this for initialization
 void Start ()
 {
  scoreLabel = GetComponent();
 }
 
 // Update is called once per frame
 void Update ()
 {
  int score = scoreKeeper.CurrentScoreValue;
  scoreLabel.text = "Score: " + score.ToString();
 }
}

And this is the BallCountLabelController.cs script, again created by right-click in the Assets folder:

using UnityEngine;
using UnityEngine.UI;
using System.Collections;

public class BallCountLabelController : MonoBehaviour
{
 Text ballCountLabel;
 public BallSpawnController ballSpawnController;

 // Use this for initialization
 void Start ()
 {
  ballCountLabel = GetComponent();
 }
 
 // Update is called once per frame
 void Update ()
 {
  int ballCount = ballSpawnController.ballCount;
  ballCountLabel.text = ballCount.ToString();
 }
}

Note that you need to include the extra using statement to get access to the Unity UI API.

Now you have a Unity editor setup that is sane, and some scripts to drive them its possible to go ahead and hook up your labels.  Its good to have a nice font for them.  Luckily I had earlier been working through Kirill Muzykov's excellent Unity GUI Tutorial on Ray Wenderlich's site and picked up a couple of fonts made available there.  The font in the image above is the Titan-One-Regular font.

Also I wanted to follow the tutorial and pick up the orange color from one of the assets, so I selected it and added the colour as a preset.

Getting a Color from a Pre-fab to use as a Preset
Here's the process for setting up the Ball Count label with the font and colour.

If you've come here without having done the Udemy course, a little background: the game is about spawning balls that fall down, and you have a limited supply of balls.  The game object that spawns the balls is just a Quad with a texture in 3D space that has the words "Touch Here".  On that Quad is a script called BallSpawnControlller, which has the value of the number of balls I wanted to display.

In Unity if you have a slot available for a script object and you drop a game object in there, like the Quad above, Unity is clever enough to find the script off the dropped object.

  First you'll need to position it correctly.  As the Canvas corresponds to the screen of the device that the game will run on - it can obviously change!!  It will depend on who is playing your game and what device they have, so you want to position it relative to the screen - not in absolutes.

1) So choose as I did here the top-left anchor preset to position it relative to the top left corner.

Setting up the Ball Count Label
2) Now you can change the X and Y values to get the label positioned right, by looking at the Game window.

3) If you have a nice font to drop into your assets, select it here.

4) Select the color you want to use for the label.  Here I chose my preset.

5) Drag-n-drop the BallCountLabelController scripts from the Assets folder onto the labels inspector window to add it, and then drag the object hosting the ball count script class into the slot, so as to get access to it at run-time.

The process is similar for the other label which handles the game score.

Setting up the Score Label
1) Again setup the anchors by choosing a preset.

2) Set up your X and Y rect positioning.

3) Finally drop in the game object to allow your label controller script to access the game data it needs to display.

OK, well that's it - hope its helpful!

Wednesday, February 11, 2015

How to Git rm a file with special characters in the name?

Git GUI tools like SourceTree and the GitHub client are great.  But there are plenty of times when the command line is exactly what you need to get the job done.

In particular if you go looking on the 'net for tips on fixing particular problems or carrying out operations that you don't do very often, you'll usually find the answer as a sequence of command lines to type out.

Also sometimes you are on a remote server via ssh and using git to fetch some project or deal with your web project managed via git.  In these cases you won't have you graphical client.

Well, here's a good git trick:  git add -i

~/depot/SpaceBotAlphaUpdate $ git add -i
           staged     unstaged path
  1:    unchanged        +0/-0 SpaceBotAlpha.spritebuilder/Icon

*** Commands ***
  1: status   2: update   3: revert   4: add untracked
  5: patch   6: diff   7: quit   8: help
What now> 2
           staged     unstaged path
  1:    unchanged        +0/-0 SpaceBotAlpha.spritebuilder/Icon
Update>> 1
           staged     unstaged path
* 1:    unchanged        +0/-0 SpaceBotAlpha.spritebuilder/Icon
Update>> ^D
updated one path

*** Commands ***
  1: status   2: update   3: revert   4: add untracked
  5: patch   6: diff   7: quit   8: help
What now> q
Bye.

~/depot/SpaceBotAlphaUpdate $ 


This command invokes the interactive form of git add, which allows you to select the files you want to add for update or as new files (which were previously untracked).

In this case SpriteBuilder had previously created a bogus file of zero length.  The last two characters in the name were unprintable and were being displayed in the console as a question mark.  The file looked like "Icon?" or "Icon/r" depending on what tool was used.

SourceTree was not able to process the file - I could select it but could not git rm it.  Finder was the same.  I could select but not delete it.

The following command allowed me to remove it from the shell:

rm -- Icon*


Here the -- marks the end of switches to the shell so that everything after -- is treated as a file name. When the shell expands the Icon* into the non-printing characters, the -- ensures that those characters aren't interpreted as switches or other controls to rm. So it was gone from the file system. Now how to remove it from source control?

The above git add -i session was the answer.

After invoking git add -i you get a basic status listing.  Here in the first line its showing that a 0 length file is currently changed in the working set (the unstaged column) but is unchanged in the cache of files about to be committed.

I type a '2' to enter the update sub-menu, where again I see the same line of output.  Typing a 1 here chooses the file listed with index 1 to be updated in the cache index of files for commit.  If the file had been modified by changing the code contents this would have added that file to the commit.

The real power comes from adding large numbers of files by typing for example

1-33,45-62

...where you select two ranges of files, and exclude the others.  Very handy for dividing large change sets up into one or more commits by selecting only the changed files you want.

Note the typing of control-D (end-of-file) to tell add -i to pop back from the sub-menu.  Here if you want you can go into the add untracked menu by typing either 'a' or '4'; to put new previously untracked files under source control.

Once you're all done, control-D out to the top menu, and do a final status with 's' to check you have what you want.  Now pop out of git add -i altogether with a 'q' for quit and type

git commit -a "My amazing changes"

to finalize the commit.

Open Source Hacking

Cocos2D is my framework of choice for games these days: its native and supports both iOS devices like the new iPhone 6, and also Android via the Apportable system which builds native NDK binaries out of Objective-C source code.
Space Bot Alpha's word balloons

Another thing to like about it is that its Open Source, which means when there's a pain point you can dive in and fix it yourself!  This is what I've been doing for the last few days, as an annoying regression appeared in Space Bot Alpha after recent updates to Cocos2D.  My speech bubbles in the current AppStore version feature coloured text, but this had stopped working in the version I'm trying to get out for release!  Also there were also problems with line splitting when the label had a width specified to fit the text into.

CCLabelBMFont is a pretty nice class: it allows making high performance labels that re-use their pre-rendered font glyphs thus avoiding overhead during those 60 frames-per-second when you might be changing the text in a label.  Changing the text simply reassigns an existing CCSprite that currently points to a texture rect to point to a different rect inside the batch-node (which is what the label is under the hood).  Performance plus!


However the re-use and hackery over the last months getting new features in to Cocos2D had meant that the old system of using getChildByTag: had gone away and an attempt to work around this had defeated the logic of being able to address individual sprites.  Also the ability to set width and subsequently wrap had been implemented by internally modifying the actual string to include more line feeds.  Basically the promise of being able to address the sprites that matched characters in the string had stopped working.

I addressed the problem by making a private sub-class of CCSprite that handles hard and soft line breaks by an enum property.  The sprites are also linked together in a list so that iterating over them doesn't require using getChildByTag:  I guess the reason it was done this way was that in Cocos2D its possible to add child nodes to anything - including the CCLabelBMFont - and you might do this if you had some graphic that you wanted to move along with the label.  The tagged children were known to be the font glyphs and not some other child that might have been added.

As well as fixing all these issues my patch adds in a function that allows addressing these child nodes via a range into the original string (which works because no extra line feeds are required) and looks like this:

    NSString *highlightString = @"even if the sound";
    NSString *testString = @"Supercalifragilisticexpialidocious even if the sound of it is something quite atrocious";
    NSRange highlightRange = [testString rangeOfString:highlightString];
    CCLabelBMFont *label = [CCLabelBMFont labelWithString:testString fntFile:@"arial16.fnt" width:currentWidth alignment:CCTextAlignmentLeft];
    [label setColor:[CCColor whiteColor]];
    NSArray *highlightChars = [label characterSpritesForRange:highlightRange];
    for (CCSprite *fontSprite in highlightChars)
    {
        [fontSprite setColor:[CCColor cyanColor]];
    }
    [label setPositionType:CCPositionTypeNormalized];
    [label setPosition:ccp(0.5f, 0.5f)];
    [[self contentNode] addChild:label];

    NSString *explanation = @"Styling font characters - color";


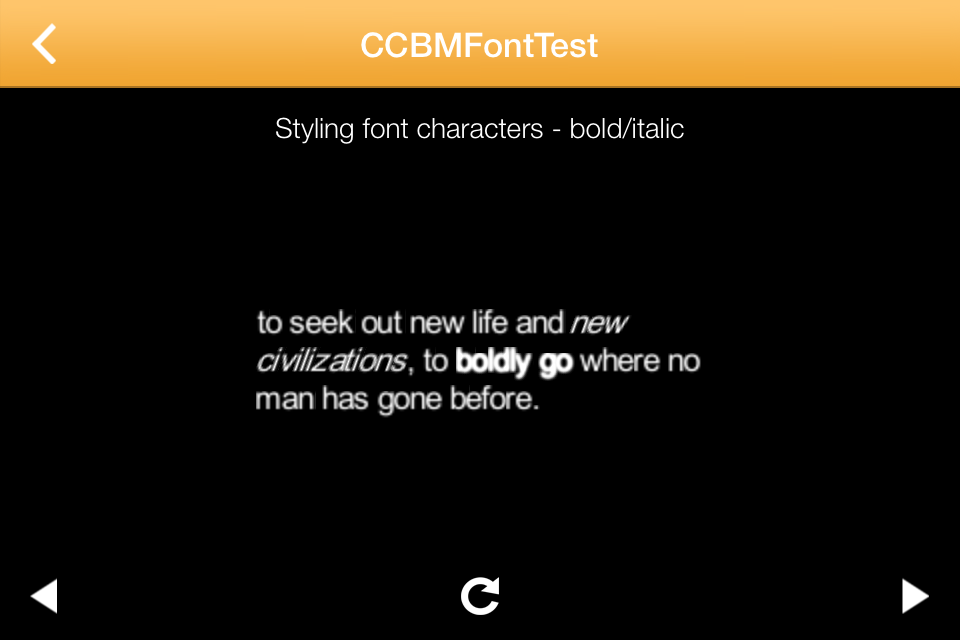
You can even get bold and italic or other effects using a similar technique.

    NSString *boldString = @"boldly go";
    NSString *italicString = @"new civilizations";
    NSString *testString = @"to seek out new life and new civilizations, to boldly go where no man has gone before.";
    NSRange boldRange = [testString rangeOfString:boldString];
    NSRange italicRange = [testString rangeOfString:italicString];
    CCLabelBMFont *label = [CCLabelBMFont labelWithString:testString fntFile:@"arial16.fnt" width:currentWidth alignment:CCTextAlignmentLeft];
    [label setColor:[CCColor whiteColor]];
    {
        NSArray *highlightChars = [label characterSpritesForRange:boldRange];
        CCEffectBloom *boldEffect = [CCEffectBloom effectWithBlurRadius:1 intensity:0.5 luminanceThreshold:0.1];
        for (CCSprite *fontSprite in highlightChars)
        {
            [fontSprite setEffect:boldEffect];
        }
    }
    {
        NSArray *highlightChars = [label characterSpritesForRange:italicRange];
        for (CCSprite *fontSprite in highlightChars)
        {
            [fontSprite setSkewX:20.0f];
        }

    }


My pull request on the Cocos2D Github project has been submitted so lets see what upstream Cocos2D folks make of it!

Monday, January 26, 2015

Cocos2D State Machine Wish List

I'm a big fan of Cocos2D for iOS and Android game development.  You only have to read the last 2-3 years of this blog to see that.  Cocos2D is tightly integrated with SpriteBuilder which is an excellent visual tool for creating levels, mapping out game objects, setting up animations and many parts of a game.  As of writing this it just keeps getting better with the advent of V4 road-map and SpriteBuilder's partnership with Apportable we see some great new features.

Right now you can easily integrate, animate and setup your assets in scenes, and then switch back to code in Swift or Objective-C to manipulate your game objects with a nice separation of responsibilities between the SpriteBuilder data files and the Cocos2D code.  

There is only one thing missing, a decent State Machine implementation.

Promotional image of Hutong Games "PlayMaker" State Machine for Unity
PlayMaker by Hutong Games - http://www.hutonggames.com

UPDATE: I have started hacking around to get a sense of how much work there is and what sort of stuff there is in SpriteBuilder's code base to help.  On Github:


Screenshot of the SpriteBuilder state machine fork
There's already some support for this from SpriteBuilder and Cocos2D folks which is awesome.  The executive summary is:

  • we can have a better state machine that suits Cocos2D games
  • we can have it visually designable in SpriteBuilder

My goal is to get something very humble that might not represent the best UI idiom up and working in the next 2-3 weeks, and this will go back to the community for some early feedback.


The gold standard for State Machine implementations at present in game development is surely Hutong Games PlayMaker for the Unity 3D game development system.  Of course PlayMaker is not available for Cocos2D, and even if it was PlayMaker's tight integration with Unity's component system would mean that Cocos2D would have to be re-architected to work with it.  There's no way that a "port" of PlayMaker to Cocos2D makes sense, as far as I can tell.  Nonetheless if you ask what is the premier experience for game developers using state machines in their work, I'd have to point out PlayMaker.

Unreal Engine - editing State Machines https://docs.unrealengine.com/latest/INT/Engine/Animation/StateMachines/EditingStateMachines/index.html
Unreal Engine's State Machine editing - http://www.unrealengine.com

Unreal Engine's editing tools also include a State Machine editor, but its very tightly bound to the skeletal animation system.  I have never built a game using Unreal but I suspect that despite the apparent power and sophistication of Unreal's editing tools you'd be hard pressed to use the State Machine to do the kind of complete visual game development that Hutong promises with PlayMaker. I know that realistically if you create a game with Unity and PlayMaker you are going to have to write some code, but if you can for example do great swathes of your game logic in PlayMaker that is very powerful as the less technically savvy members of your team can then get in and work on play without having to know C# or how to script & code Unity.

What Can We Learn?

So we don't have PlayMaker in Cocos2D, but we have an opportunity to learn from the state machine implementations of others, and make something great for 2D game development in our favourite toolkit.

Given a port of these tools is not the right thing, what can we take from PlayMaker?  Of the many things that PlayMaker gets right with respect to its visual editor would have to also be gotten right for a decent State Machine implementation for Cocos2D:
  • tight integration with the visual level editor
  • preview states and actions in the visual level editor
  • states, events and transitions can be stored inside objects/components
  • on publish, state machine data is integrated with the game object files
  • tight integration with object animations to easily do common things
  • can be used for many parts of gameplay, not just animations
Obviously in the case of Cocos2D the editor is the SpriteBuilder tool, which already handles animations and visual editing of many object properties.  We could in theory make a separate State Editor but it would have to be able to be docked in Sprite Builder in order to achieve these things.

What is there Already for Cocos2D?

At present Cocos2D has many of the things needed to profit from a great State Machine implementation, but there are no pro-grade State Machine tools around as far as I know.

There are a few open source implementations around for State Machines in code.  I used Blake Watter's Transition Kit in my game Space Bot Alpha.  Its a nice project, well set up with CocoaPods, unit-testing and so on, so as a piece of Software Engineering its nicely done.  But for game development for me it really failed on the count of making my job easier.  I wound up doing more work for it that it did for me.

A big part of why that was the case is that there is no tooling integration.  I cannot create a State Machine visually with Transition Kit, or any of the other current offerings - it all has to be done in code.  First off this has the problem that its very difficult to do this with a nice separation of concerns and a clean interface.  You wind up embedding the State Machine setup into the objects initialisers and then calling the transitions from various places scattered throughout the code.  Secondly its time consuming and confusing to layout the State Machine in code - with the best syntax and API in the world any useful state machine quickly becomes cumbersome and difficult to maintain.

A second problem is that there is no tight integration between the Cocos2D objects and the State Machines.  You would have to write a whole binding system, but that is work over and above writing the game I needed to write.

Think about Chipmunk as it is bound in Cocos2D right now.  Just turning on Physics and having Cocos2D node objects under a Physics node in SpriteBuilder enables it for physics.  Then once I have checked the enable physics box, the Chipmunk system can change the x and y position of my Cocos2D nodes in response to the physics simulation all without me having to write any code.  Nice!

That's how it should be for a State Machine.  I should be able to hook up a State Machine to my object and have transitions drive changes in the objects properties.  Even if that had to be done in code, having some sort of binding system would save a lot of work.  As it is the code to alter properties in response to state changes gets messy and its easy to circumvent the state machine by mistake and get unexpected results.

Another interesting project is hsm-statechart which is written in C, and is scriptable in Lua.  In theory this should be easy enough to integrate into a Cocos2D project.  However despite some attractive extra features (discussed below) relating to Hierarchical State Machines, and C performance, I tried Transition Kit first as it had an Objective-C API already.

Also worth understanding is the Apache SCXML project which provides an XML format for describing HSM's like those you can build with hsm-statechart.

Memory and Performance

Another problem I see with some State Machine implementations - and Transition Kit is not too bad here but it could be better - is object proliferation.  Its should be possible to create states and destroy them without doing a lot of allocation and destroying of objects off the heap.  Let's imagine we have a zombie game with 40 zombies, and a hero firing hundreds of bullets - we don't want to have an NSObject for every state in every machine for each of those.  But that's how some FSM's are set up.

Instead you need some sort of manager class that can create a unique state machine "pointer" record without duplicating the state objects for each entity using that machine.  Its like a set of CPU registers for a process or thread referencing a copy of a binary program file without making a copy of it for each process or thread.

Also for performance the management of updates on the machine would have to be done well - tightly integrated with the game objects own update mechanism where timers were needed; or designed so that it does not unnecessarily get updated.  String dispatch would be ideal, as long as it does not impact on performance, and it should be used where it can reduce coupling of the objects in the program - we don't want to create circular pointer chains that could result in ARC retain cycles.

Blending and Animation Integration

Check this video on setting up an animated door in Unity using PlayMaker.  Of particular interest is the blending of the open to the closed state & animation which comes for free.  Here you have an animation for the "closed" door, which specifies certain XYZ positions for the door model, and similarly XYZ positions for the "open" animation.  Creating a transition between open and closed gives you a smooth blending from one set of XYZ to the other, similarly as setting keyframes for a Cocos2D animation would.


In a game getting the State Machine to work well with the animation and actions system is vital.  If a whole lot of extra code has to be written to get this to happen the you wind up doing more work for the State Machine than it does for you.  Blending is part of the story - here you are getting basic animations for free just for using the State Machine.  But where you want to have an animation play as an object transitions from one state to the next you need extra care.

Sub-States: A Hierarchical State Machine

How do you handle the fact that during an animation from open to closed, you are not really in either of those states but in fact you're in some in-between animation state??

One option is to have a 4-state model for your door: open, closing, closed and opening and then you can have the animation complete handler for the closing animation cause the transition from closing to closed.  The problem with this is when you have some other game logic that depends on checking the state of the door.  Lets say you have some poison gas in the room - it can escape into the adjoining room if the state of the door is one of open, closing, and opening - but if an NPC character wants to walk through the door they can only do so in the open state.

A more complex State Machine implementation is to use State Charts to solve the problem.  These add hierarchies of states, and also variables & guards to the system.  Variables are like game objects values, except they only exist within the framework of the State Machine.  Heierarchies mean that you can take the animation states which are visual effects that depict and implement an object; and place them inside a semantic (or meaning related) concept of a state.  So you could have two high-level states of Closed and Open; with Open having as sub-states Opening, Closing and and Completely-Open animation states.  This way you can have the Open high-level state trigger the release of the gas, and the NPC only get access when the low-level state Completely-Open is triggered.

Effectively what you are doing is grouping your states.  You need to specify which of the sub-states is entered when the superstate is entered, and there are some other details, but basically they're an extension of the simpler FSM concept.

So here's the remainder of the items, which would apply to a State Machine implementation regardless of the game level editor question.  Here's part 2 on my wish list:
  • the FSM must have simple bindings to objects (like Chipmunk)
  • transitions can be configured to drive changes in objects properties
  • blending of property changes should come for free (see video)
  • load states, transitions and events by reading some kind of data file
  • can also create states, transitions and events in code if needed (rarely)
  • state machines can be serialised for use in save/load-game and other cases
  • small memory footprint/CPU usage
  • ability to specify variables and guards as for HSMs (nice to have)
When?  Why?

I think having a solid State Machine implementation with editor support would get new comers to game development much more excited, productive and involved in game development.  It could give existing experienced developers relief from some tedious, detail-focused coding tasks and make those things accessible to the level designers.  And it could make complex bug-prone parts of a game project into data-driven cleanly-seperated modules.  I think it would have huge value.

I'd like to see this happen, so I might be interested in pitching in on such a project.  But it would need broad adoption by the core SpriteBuilder/Cocos2D team.  Let's see if we can get them to have a think about it.  :-)